Advanced Carousel Tutorial — How You Can Design, Code, and Customize Like a Pro
Ever landed on a website where images glide smoothly, one after another, with just the right amount of motion? You probably didn’t notice, but what caught your eye was an advanced carousel — that sleek image or content slider that makes any page come alive.
In this newsletter, I’ll walk you via how an advanced carousel works in Elementor, how you could code one yourself the use of HTML, CSS, and JavaScript, and in the end, the way to combine it into Shopify.
So, grasp a espresso — this one’s going to be each fun and realistic.
Comparison Table — Advanced Carousel Design Methods
| Method | Platform/Tool | Difficulty Level | Best For | Customization Options | Example/Tip |
|---|---|---|---|---|---|
| Elementor Carousel | Elementor Pro / Free (with Addons) | ⭐ Easy | Non-coders, Designers | Animations, Autoplay, Coverflow, Shadows | Use Coverflow for a 3D premium effect |
| Custom Coded Carousel | HTML, CSS, JavaScript | ⭐⭐ Medium | Developers who want full control | Layout, Autoplay, Swiping, Responsive tweaks | Use setInterval() for smooth autoplay |
| Shopify Carousel | Shopify Liquid or Carousel Apps | ⭐⭐ Medium | E-commerce stores | Product & Collection Sliders | Try “POWR Image Slider” or “Collection Carousel” |
| Third-party Plugins | Essential Addons, Happy Addons | ⭐ Easy | Elementor Free users | Animation styles, Image sliders | Works great with Elementor Free |
| Responsive Carousel | Any device using CSS Media Queries | ⭐⭐ Medium | Mobile-first websites | Responsive sizing, Adaptive layout | Always test on real devices |
1. What Exactly Is an Advanced Carousel?
A carousel (also called a slider) is simply a rotating set of images or content. But an advanced carousel takes it up a notch. It includes features like:
- Autoplay transitions
- Touch swipe for mobile
- Thumbnail navigation
- Custom animation styles
- Dynamic content integration
Think of it as a storytelling tool — one that moves visually instead of with words.
2. Why Use an Advanced Carousel in Web Design?
Soch kar dekho — when a visitor lands on your site, they make a decision within seconds. An superior carousel right away grabs interest.
Here’s why it’s worth your attempt:
- Keeps users engaged longer
- Highlights merchandise or portfolios fantastically
- Works exquisite for cell-friendly designs
- Adds movement without heavy code or lag
In quick, it makes your internet site experience alive — not static.
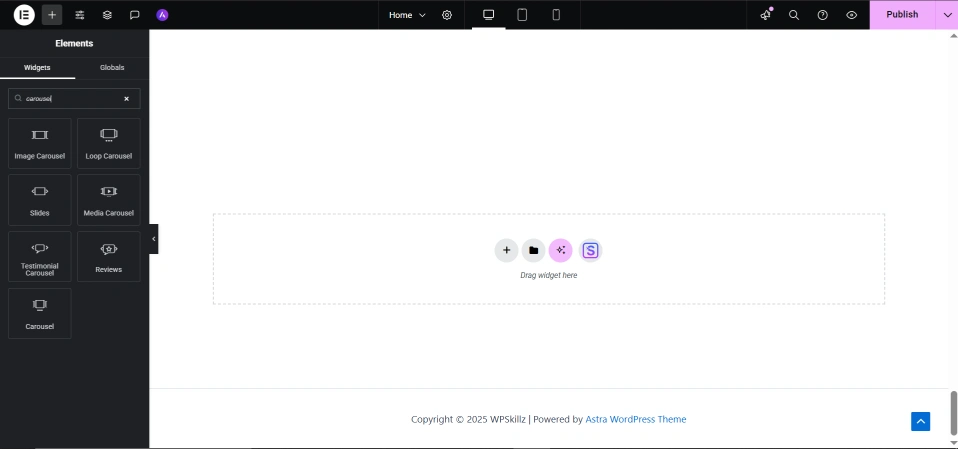
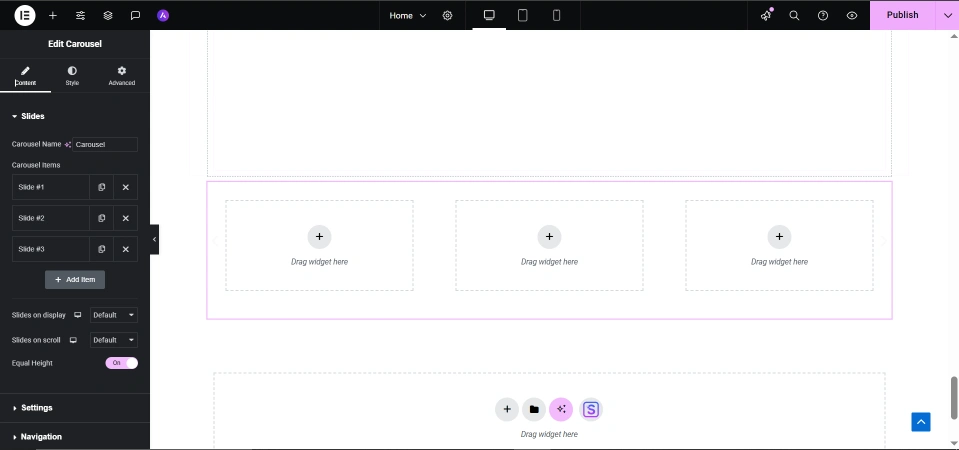
3. Advanced Carousel in Elementor (No Coding Needed)
Elementor Pro gives you a built-in carousel widget, but the actual magic happens when you start customizing it.
Here’s the way to use it:
- Open your Elementor web page and look for “Carousel” in widgets.
- Drag the Image Carousel Widget onto your segment.
- Add your images or cards.
- Under “Settings,” allow Autoplay and alter velocity (e.G., 5000 ms).
- In “Style,” tweak border-radius, shadows, and hover animations.
💡 Pro Tip:
Use “Coverflow Carousel” fashion for 3-D intensity — it seems top class and current.
If you’re the use of the unfastened Elementor model, you could nonetheless create an advanced carousel using “Essential Addons” or “Premium Addons” plugins.
4. Coding an Advanced Carousel (HTML, CSS & JavaScript)
Now, allow’s say you’re a developer who loves a piece of control.
Here’s a smooth instance of the way to code your personal carousel from scratch 👇
<div class="carousel">
  <div class="slides">
    <img src="img1.jpg" alt="Slide 1">
    <img src="img2.jpg" alt="Slide 2">
    <img src="img3.jpg" alt="Slide 3">
  </div>
</div>

<button class="prev">❮</button>
<button class="next">❯</button>

<script>
  const slides = document.querySelector('.slides');
  const images = document.querySelectorAll('.slides img');
  let index = 0;

  document.querySelector('.next').addEventListener('click', () => {
    index = (index + 1) % images.length;
    slides.style.transform = `translateX(${-index * 100}%)`;
  });

  document.querySelector('.prev').addEventListener('click', () => {
    index = (index - 1 + images.length) % images.length;
    slides.style.transform = `translateX(${-index * 100}%)`;
  });
</script>

<style>
.carousel { overflow: hidden; width: 100%; max-width: 800px; margin: auto; }
.slides { display: flex; transition: transform 0.5s ease; }
.slides img { width: 100%; border-radius: 15px; }
button { position: absolute; top: 50%; transform: translateY(-50%); }
.prev { left: 10px; } .next { right: 10px; }
</style>
✅ Output:
A easy yet easy carousel slider that you may decorate with autoplay or swipe gestures later.
💡 Add-on Tip:
Want autoplay? Add this interior your script:
setInterval(() => {
  index = (index + 1) % images.length;
  slides.style.transform = `translateX(${-index * 100}%)`;
}, 3000);
5. Responsive Carousel Design (For All Screens)
One common mistake developers make — carousels that break on mobile.
To make your carousel responsive, use CSS like this:
@media (max-width: 768px) {
  .slides img { border-radius: 10px; }
  button { font-size: 20px; }
}
This ensures that your carousel adapts flawlessly to tablets and phones.
Always check on real gadgets before publishing.
6. Advanced Carousel in Shopify (Product & Collection Slider)
If you run an online store, this is where it gets exciting.
Shopify themes can integrate custom carousels using either Liquid code or apps.
Manual Method (with Liquid):
- Go to Online Store → Themes → Edit Code
- Open the phase file, e.G., featured-series.Liquid
- Paste your carousel structure interior a <div elegance=”carousel”> field
- Include your JavaScript and CSS much like the example above
Or use a Shopify App like:
- “Image Slider + Carousel by using POWR”
- “Collection Carousel Slider”
💡 Shopify Pro Tip:
Add “loop:true” and “autoplay:real” for better product visibility — works wonders for conversions.
7. Common carousel problems and how to fix them
- ❌ Carousel not sliding? → Check your JS selector and element class names.
- ❌ Images not aligned? → Use Show: Flex in slides.
- ❌ Autoplay not working anymore? → Check interval timing and script placement.
Simple mistakes can damage the animation, so always take a look at the step-by-step instructions used.
8.Carousel Customization Techniques
You can take your carousel to the next degree with:
- Thumbnail navigation (small preview images below leading slides)
- Fade transition to a sliding selection
- Card based full layout (using CSS grid)
- Vertical carousel for testimonials or text content sliders
Experimentation is key. Every little tweak makes your site stand out.
9. FAQs
Q1. What’s the difference among simple and superior carousel?
A basic carousel simply slides pics. An advanced carousel consists of autoplay, swipe, thumbnails, and custom animation.
Q2. Can I create a sophisticated carousel in Elementor free model?
Yes, with plugins like “Premium Addons for Elementor” or “Happy Addons.”
Q3. How do I make my carousel autoplay using JavaScript?
Add setInterval() with slide remodel common sense — see code instance above.
10. The Bottom Line
An superior carousel isn’t just a layout element — it’s an revel in.
It allows you show content dynamically, improves consumer engagement, and gives your website that polished,
So whether you’re building on Elementor, coding manually, or setting up on Shopify, the key is to balance animation and usability.
Try these techniques yourself — and watch your site come alive!
You can also watch our videos on our YouTube channel or comment on our Facebook page for more help.