Simple Ways You’ll Actually Use
Ever felt that your website looks a little too quiet?
You write amazing content, but still, visitors just scroll and leave. Believe it or not, videos can completely change that.
A short clip — maybe a tutorial, product demo, or even a personal message — can grab attention faster than any headline.
Now the big question: how can you embed YouTube videos on your website, or even better, show your own videos professionally?
Let’s break it down step by step, in a real and easy way.
Why You Should Embed Videos on Your Website
Let’s think for a second.
When you open a page and see a video that instantly explains what the page is about, doesn’t that feel easier than reading big paragraphs?
That’s exactly what embedding videos does — it makes your website talk to the visitor.
Here’s what you get when you add videos:
- Visitors stay longer (Google notices that).
- People understand your message faster.
- Your brand looks more trustworthy and modern.
- Search engines push your page higher because of rich media.
- And honestly, it just feels more personal.
So, in case your intention is to keep humans engaged, this one trick works like magic.
Method 1: Add YouTube Videos Embed Code from YouTube (Easiest Way)
If your website is built on WordPress, Elementor makes your life extremely good easy. No coding, no confusion — just drag, drop, and achieved.
Here’s how you could do it like a seasoned 👇
Step 1: Open Elementor
Log in in your WordPress dashboard and click on Edit with Elementor at the page you want to edit.
Step 2: Add the Video Widget
From the Elementor panel, drag the Video Widget and place it wherever you want — maybe right under your headline or in your About section.
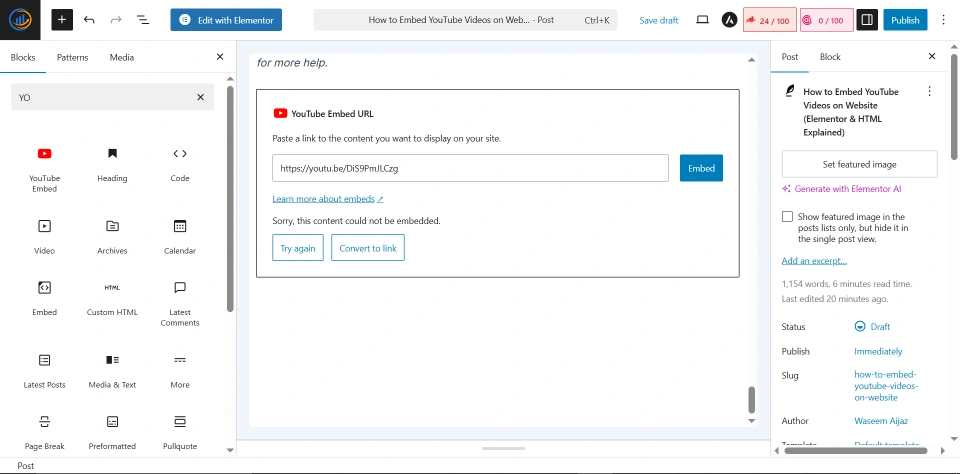
Step 3: Paste the YouTube Link
In the left settings bar, you’ll see an option called Link. Paste your YouTube video URL there (as an example: https://youtu.be/SZDtGj43Lnk?si=g2PMJTjBzULven7_).
Boom — the video seems right away. No more code wanted.
Step 4: Customize Settings
You can satisfactory-music the video like this:
- Turn on autoplay for landing pages.
- Use mute if you don’t want sound to begin automatically.
- Add start and give up time to manipulate playback.
- Turn on lazy load to improve page speed.
- Add a custom thumbnail so your layout stays easy.
💡 Pro tip: Lazy Load enables your page load faster — Google without a doubt likes that.
Step 5: Make It Mobile Friendly
Before saving, click on at the cellular view icon in Elementor and test the way it looks. Make sure it suits smartly on smaller displays.
That’s it — your YouTube video is stay!
Method 2: Embed YouTube Videos with Custom HTML Code
Maybe you’re no longer the usage of Elementor, otherwise you just love doing things manually. No hassle — you could embed videos the usage of easy HTML.
Here’s how 👇
Step 1: Get the Embed Code from YouTube
Go to the YouTube video → click Share → Embed → reproduction the code that pops up.
IIt’ll appearance something like this:
<iframe width="560" height="315"
src="https://www.youtube.com/embed/VIDEO_ID"
frameborder="0" allowfullscreen></iframe>
Step 2: Paste the Code into Your Page
Open your HTML editor and paste that code in which you need the video to appear.
Example:
<section>
  <h2>Watch How It Works</h2>
  <iframe width="100%" height="400" src="https://youtu.be/SZDtGj43Lnk?si=g2PMJTjBzULven7_" allowfullscreen></iframe>
</section>
💡 Tip: Always use width=”100%” so it adjusts flawlessly on all screens.
Step 3: Add Custom Features
You can manipulate how your video behaves the usage of easy parameters.
Example:
https://youtu.be/L4HicNFwhkY?si=BKrP6IkT_Pnk9Y9x
This starts offevolved your video robotically, with out sound, from the 30-2d mark. Pretty cool, right?
How to Add Your Own MP4 Videos (Self-Hosted Method)
Sometimes you don’t want YouTube logos, ads, or links — you just want your own video to play cleanly on your website.
That’s known as a self-hosted video.
Let’s see how you may do it easily.
Step 1: Upload Your Video
First, add your MP4 video in your website hosting account (as an example, in a folder like /motion pictures/intro.Mp4).
Step 2: Use the HTML5 Video Tag
Now upload this code wherein you need it:
<video width="100%" controls>
  <source src="videos/intro.mp4" type="video/mp4">
  Your browser does not support the video tag.
</video>
That’s it — no YouTube wished!
Your very own record plays without delay out of your website.
💡 Tip: Compress your video before importing. It saves bandwidth and continues your website rapid.
Add Your Own MP4 Videos in Elementor
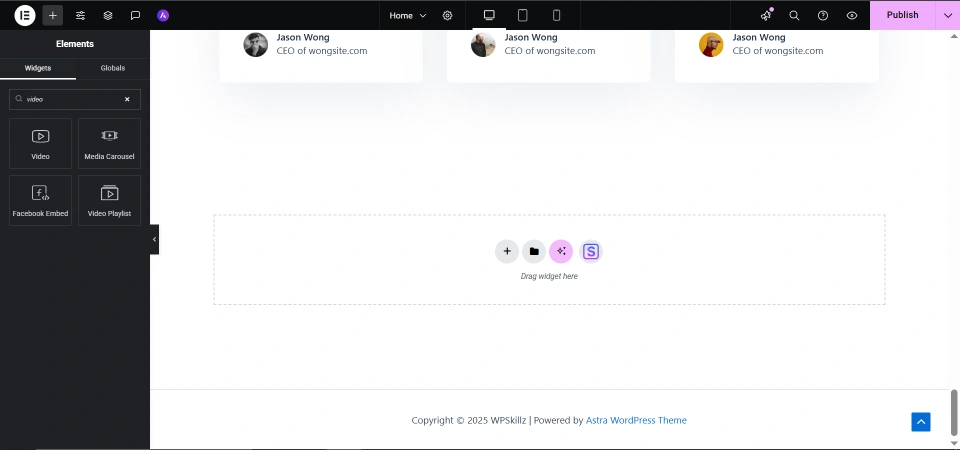
If you’re an Elementor user, the procedure is even smoother:
- Open your web page in Elementor.
- Drag the Video Widget.
- Under Source, pick Self-Hosted.
- Upload your MP4 report.
- Adjust settings like Autoplay, Loop, or Mute.
- Click Update and also you’re accomplished!
Now your internet site can proudly show your personal movies with out counting on any platform.
Make Your Videos Load Fast (Performance Tips)
Videos are heavy, and in case you’re not careful, they are able to slow down your web page.
But with a few hints, you could maintain your web page lightning rapid:
- Always allow lazy load (delays video loading until it’s visible).
- Use compressed thumbnails as opposed to massive photographs.
- Avoid setting too many movies on a single web page.
- Keep MP4 documents small (underneath 20–25MB).
- Use a CDN (Content Delivery Network) for quicker international transport.
Remember, a gradual website method frustrated traffic — and Google hates that too.
Search Engine Optimization Tips for Embedded Videos
Embedding movies doesn’t simply make your website online appearance excellent — it also helps with search engine optimization.
Here’s how you may make the most of it:
- Write a quick precis or caption underneath each video.
- Add schema markup for movies (enables Google understand the content).
- Always use your essential keyword in the video identify and outline.
- Use a custom thumbnail — it improves click-through rates.
- If it’s a YouTube video, link back to your website in the description.
That’s how you turn a simple video into a traffic magnet.
❓FAQs
Q1: Can I embed YouTube videos for free?
Embedding videos from YouTube is completely free – you just need the link.
Q2: Which method is better – Elementor or HTML?
If you use WordPress, Elementor is even easier.
If you’re coding manually, HTML offers more flexibility.
Q3: Can I use my own videos instead of YouTube?
Of course. Simply upload your MP4 and use the <video> HTML tag or Elementor’s self-hosted option.
Q4: Will it affect site speed?
Only if you skip optimization. Use lazy loading and small files and your site will be faster.
Final Thoughts
In short – videos make your website feel alive. They tell stories, care and build trust like nothing else.
Whether you’re using Elementor’s video widget or using custom HTML, embedding videos is one of the smartest moves you can make to grow your website.
So go ahead — add a video, hit update, and watch your visitors stay longer than ever.
💬 You can also watch our videos on our YouTube channel or comment on our Facebook page for more help.